Cloud-Agnostic-Startup-Platform
Authentication and Authorization with Istio and Keycloak
In this guide, we will explore how to leverage Istio to implement authentication and authorization using Keycloak. The goal is to simplify development, allowing developers to focus on their core tasks without worrying about authentication and authorization. We will cover this step-by-step with practical examples and working sample codes.

Contents
- Introduction to Keycloak
- Introduction to Istio
- Introduction to FastAPI
- Deploying the job-service Microservice without Authentication and Authorization
- Istio Weight-Based Traffic Routing between job-service-v1 and job-service-v2
- Implementing Authentication with Istio
- Passing the JWT Token to Backend Services
- Improving the Code with Additional Constraints
- Decoding the Token to get the Logged-in User
- Validate the Ownership of an Item
- Implementing Authorization with Istio (Based on Keycloak Roles)
- Implementing Authorization between Microservices
Introduction to Keycloak
Keycloak is an open-source identity and access management solution that offers single sign-on (SSO) capabilities, allowing users to authenticate once and access multiple applications and services with a single set of credentials. One of the features I find particularly impressive is Keycloak’s ability to simplify the development process by enabling the integration of custom themes for the authentication flow, such as the login page. In this scenario, we have deployed Keycloak within the same Kubernetes cluster.
Following is the Dockerfile which we use to build a custom Keycloak image with our own theme and the event listener.
FROM quay.io/keycloak/keycloak:24.0.3
COPY ./ex-offenders-theme /opt/keycloak/themes/ex-offenders-theme
COPY ./providers/create-account-custom-spi.jar /opt/keycloak/providers/create-account-custom-spi.jar
We use the following deployment manifest to deploy Keycloak.
apiVersion: apps/v1
kind: Deployment
metadata:
  name: keycloak
  namespace: keycloak
  labels:
    app: keycloak
spec:
  replicas: 1
  selector:
    matchLabels:
      app: keycloak
  template:
    metadata:
      labels:
        app: keycloak
    spec:
      serviceAccountName: keycloak
      automountServiceAccountToken: true
      containers:
        - name: keycloak
          image: eocontainerregistry.azurecr.io/keycloak:v1.8.6 # {"$imagepolicy": "flux-system:keycloak"}
          args: ["start"]
          env:
            - name: KEYCLOAK_ADMIN
              value: "admin"
            - name: KEYCLOAK_ADMIN_PASSWORD
              valueFrom:
                secretKeyRef:
                  name: keycloak
                  key: admin-password
            - name: KC_HOSTNAME
              value: auth.ex-offenders.co.uk
            - name: KC_PROXY
              value: "edge"
            - name: KC_DB
              value: mysql
            - name: KC_DB_URL
              value: "jdbc:mysql://keycloakdb-keycloakdb-mysql.keycloakdb.svc.cluster.local:3306/keycloakdb"
            - name: KC_DB_USERNAME
              value: "keycloak-user"
            - name: jgroups.dns.query
              value: keycloak
            - name: KC_DB_PASSWORD
              valueFrom:
                secretKeyRef:
                  name: keycloak
                  key: db-password
          ports:
            - name: http
              containerPort: 8080
            - name: jgroups
              containerPort: 7600
      imagePullSecrets:
        - name: acr-secret
Notice FluxCD imagepolicy reference in the manifest file. With this, we can automate the deployment whenever a new image is available in the image repository.
Introduction to Istio
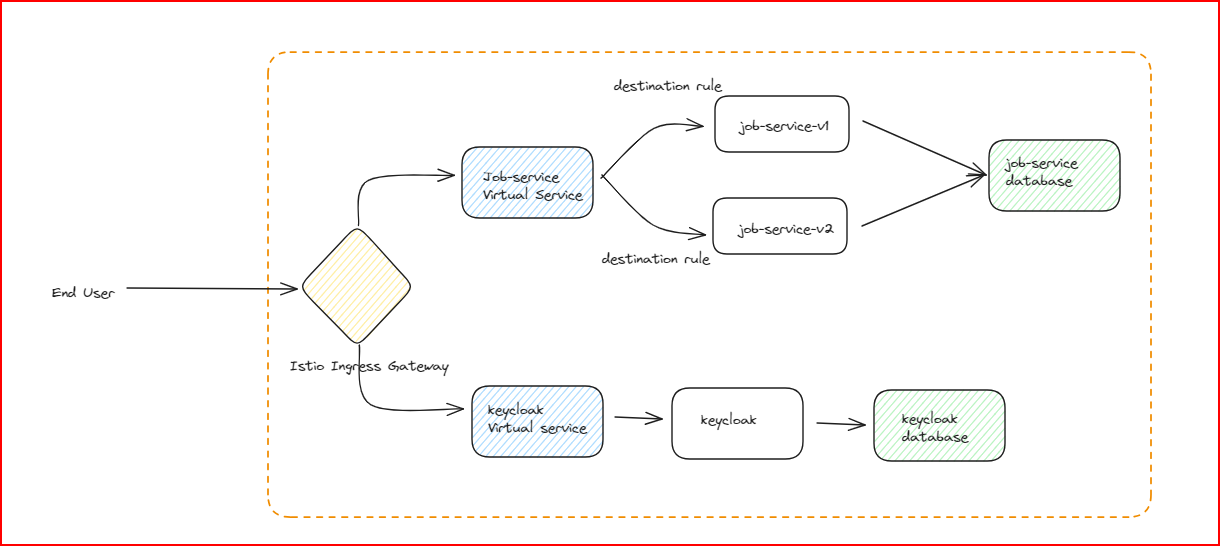
Istio is an open-source service mesh platform designed to manage how microservices communicate and share data. It provides a variety of features to improve the observability, security, and management of microservice applications. We will soon discuss how we have configured Istio.
Introduction to FastAPI
FastAPI is a modern Python framework that is rapidly gaining popularity. It is designed for rapid development and to maximize the developer experience. In this example, we will use two versions of a job API (V1, V2,) written in FastAPI. The API utilizes the SQLModel library to interact with the backend database, combining features from both SQLAlchemy and Pydantic.
SQLModel is developed by the same author as FastAPI.
Deploying job-service without Authentication and Authorization
Let’s start with something simpler: a working microservice without any authentication or authorization.
Here are the deployment manifests for job-service v1 and job-service v2, both running in the “job-service” namespace. Take note of the version label in each deployment manifest.
apiVersion: apps/v1
kind: Deployment
metadata:
  labels:
    app: job-service
    version: v1
  name: job-service
  namespace: job-service
spec:
  replicas: 1
  selector:
    matchLabels:
      app: job-service
      version: v1
  template:
    metadata:
      labels:
        app: job-service
        version: v1
    spec:
      serviceAccountName: job-service
      automountServiceAccountToken: true
      containers:
      - image: eocontainerregistry.azurecr.io/job-service:v1.0.3 # {"$imagepolicy": "flux-system:job-service-v1"}
        name: job-service
        env:
        - name: DB_HOST
          value: "keycloakdb-keycloakdb-mysql.keycloakdb.svc.cluster.local"
        - name: DB_PASSWORD
          valueFrom:
            secretKeyRef:
              name: job-service
              key: db-password
        - name: DB_PORT
          value: "3306"
        - name: DB_USER
          value: "job-service"
        - name: DB_NAME
          value: "job-service"
        resources:
          requests:
            memory: "64Mi"
            cpu: "50m"
      imagePullSecrets:
      - name: acr-secret
apiVersion: apps/v1
kind: Deployment
metadata:
  labels:
    app: job-service
    version: v2
  name: job-service-v2
  namespace: job-service
spec:
  replicas: 1
  selector:
    matchLabels:
      app: job-service
      version: v2
  template:
    metadata:
      labels:
        app: job-service
        version: v2
    spec:
      serviceAccountName: job-service
      automountServiceAccountToken: true
      containers:
      - image: eocontainerregistry.azurecr.io/job-service-v2:v1.1.3 # {"$imagepolicy": "flux-system:job-service-v2"}
        name: job-service
        env:
        - name: DB_HOST
          value: "keycloakdb-keycloakdb-mysql.keycloakdb.svc.cluster.local"
        - name: DB_PASSWORD
          valueFrom:
            secretKeyRef:
              name: job-service
              key: db-password
        - name: DB_PORT
          value: "3306"
        - name: DB_USER
          value: "job-service"
        - name: DB_NAME
          value: "job-service"
        resources:
          requests:
            memory: "64Mi"
            cpu: "50m"
      imagePullSecrets:
      - name: acr-secret
We also have a ClusterIP service with the selector “app=job-service.” This configuration ensures that both job-service v1 and job-service v2 are added as endpoints of this service.
apiVersion: v1
kind: Service
metadata:
  labels:
    app: job-service
    kustomize.toolkit.fluxcd.io/name: flux-system
    kustomize.toolkit.fluxcd.io/namespace: flux-system
  name: job-service
  namespace: job-service
spec:
  ports:
  - port: 80
    name: http
    protocol: TCP
    targetPort: 8080
  selector:
    app: job-service
  type: ClusterIP
Additionally, note that we are using the same database instance for both Keycloak and the job-service versions. However, the respective users are restricted from accessing each other’s databases. This setup, despite sharing the same instance, effectively mimics a microservice architecture.
For the first step, we want to route all traffic exclusively to the v1 deployment. (If you look at job-service v1, you’ll see that it has been written without any authentication or authorization in the code. We plan to implement these features using Istio in the upcoming steps.)
To achieve this, we create a virtual service and a destination rule as follows.
apiVersion: networking.istio.io/v1alpha3
kind: VirtualService
metadata:
  name: job-service
  namespace: job-service
spec:
  hosts:
    - "www.ex-offenders.co.uk"
    - "ex-offenders.co.uk"
    - job-service.job-service.svc.cluster.local
  gateways:
    - istio-system/gateway
    - mesh
  http:
    - match:
        - uri:
            prefix: "/api/jobs"
        - uri:
            prefix: "/api/jobcategories"
      route:
        - destination:
            host: job-service.job-service.svc.cluster.local
            subset: v1
          weight: 100
        - destination:
            host: job-service.job-service.svc.cluster.local
            subset: v2
          weight: 0
apiVersion: networking.istio.io/v1alpha3
kind: DestinationRule
metadata:
  name: job-service
  namespace: job-service
spec:
  host: job-service.job-service.svc.cluster.local
  subsets:
  - name: v1
    labels:
      version: v1
  - name: v2
    labels:
      version: v2
Note that under the gateways section, we specify both our ingress gateway and “mesh.” This is because we expect traffic from both the external gateway and other microservices within the cluster. Observe how we have directed 100% of the traffic to the v1 deployment.
Below is Istio gateway resource. It handles traffic destined for the ex-offenders.co.uk domain. Additionally, we’ve attached a Let’s Encrypt TLS certificate to the gateway using cert-manager.
apiVersion: networking.istio.io/v1alpha3
kind: Gateway
metadata:
  name: gateway
  namespace: istio-system
spec:
  selector:
    istio: ingressgateway
  servers:
    - port:
        number: 443
        name: https
        protocol: HTTPS
      tls:
        mode: SIMPLE
        credentialName: ex-offenders-tls
      hosts:
      - "www.ex-offenders.co.uk"
      - "ex-offenders.co.uk"
      - "auth.ex-offenders.co.uk"
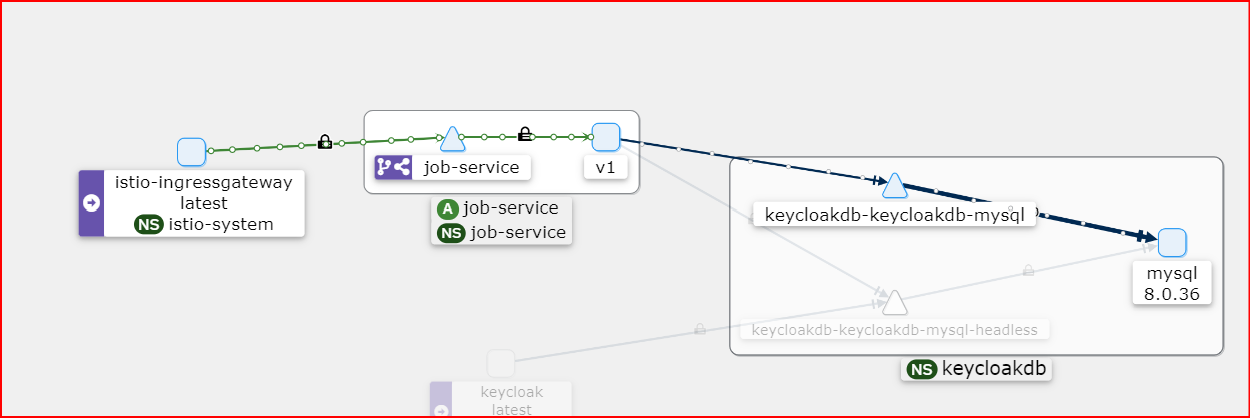
We can use Kiali dashboard to validate our routing configuration. Note that, job-service connects to the same keycloakdb MySQL instance. But in reality, job-service has access only to it’s specific job-service database inside the instance.

Now we are ready to do some testing.
Creating a new job category
 curl --location 'https://ex-offenders.co.uk/api/jobcategories/' \
--header 'Content-Type: application/json' \
--data '{
    "name": "Information Technology"
}'
{"name":"Information Technology","id":17}
Creating a new job
curl --location 'https://ex-offenders.co.uk/api/jobs/' \ 'https://ex-offenders.co.uk/api/jobs/' \
--header 'Content-Type: application/json' \
--data '{
  "title": "Software Engineer",
  "description": "Software Engineer with 2 years of experience",
  "owner_id": "5690cc29-5008-4a81-8f08-db92e01d6d44",
  "category_id": 17
}'
{"title":"Software Engineer","description":"Software Engineer with 2 years of experience","owner_id":"5690cc29-5008-4a81-8f08-db92e01d6d44","category_id":17,"id":"f19e68da-e40a-4954-9dbf-6dfaf1f7f4d4"}
Get job category by ID
curl --location 'https://ex-offenders.co.uk/api/jobcategories/17'
{"name":"Information Technology","id":17}
Get job by ID
curl --location 'https://ex-offenders.co.uk/api/jobs/bff285f6-34f6-4c5f-9619-2e860bec2d87'
{"title":"Software Engineer","description":"Software Engineer with 2 years of experience","owner_id":"5690cc29-5008-4a81-8f08-db92e01d6d44","category_id":17,"id":"bff285f6-34f6-4c5f-9619-2e860bec2d87"}
As you can see, there is no authentication or authorization on these endpoints. Anyone can create, update, delete, or retrieve jobs and job categories.
Note: I used Swagger, which is integrated with FastAPI, to generate the sample curl requests.
Also, please note that when creating new jobs, we manually pass the owner_id with the request. Ideally, this should be the user ID of the logged-in user. We will delve further into this when discussing job-service v2.
Implementing Authentication with Istio
Let’s secure our endpoints.
Firstly, let’s add the RequestAuthentication resource, which defines the supported request authentications for the workload. This configuration ensures that Istio rejects any request with invalid authentication information. Below, we have defined our Keycloak issuer URL and public certificate URL to enable Istio to verify the token signature.
apiVersion: security.istio.io/v1beta1
kind: RequestAuthentication
metadata:
  name: job-service
  namespace: job-service
spec:
  selector:
     matchLabels:
      app: job-service
  jwtRules:
   - issuer: "https://auth.ex-offenders.co.uk/realms/ex-offenders"
     jwksUri: "https://auth.ex-offenders.co.uk/realms/ex-offenders/protocol/openid-connect/certs"
     forwardOriginalToken: true
Additionally, we have set “forwardOriginalToken”: true, as we need to pass the token in the format “Authorization: Bearer
   jwtRules:
    - issuer: "https://auth.ex-offenders.co.uk/realms/ex-offenders"
      jwksUri: "https://auth.ex-offenders.co.uk/realms/ex-offenders/protocol/openid-connect/certs"
      outputPayloadToHeader: jwt-parsed
Now, RequestAuthentication will reject any request with an invalid token. However, requests without any authentication information will still be accepted, but they won’t have an authenticated identity. To handle these cases, in addition to RequestAuthentication, we need to drop requests that lack an authentication identity. Therefore, we add an authorization policy as follows:
apiVersion: security.istio.io/v1beta1
kind: AuthorizationPolicy
metadata:
  name: job-service
  namespace: job-service
spec:
  selector:
    matchLabels:
       app: job-service
  rules:
  - to:
    - operation:
        methods: ["GET"]
  - from:
    - source:
        requestPrincipals: ["*"]
    to:
    - operation:
        methods: ["POST", "DELETE", "PATCH"]
        paths: ["/api/jobs*"]
    - operation:
        methods: ["POST", "DELETE", "PATCH"]
        paths: ["/api/jobcategories*"]
So, with the above AuthorizationPolicy, we have allowed unrestricted access to the GET method for anyone. However, authentication is required for any other methods on the job and jobcategory endpoints.
Let’s test some endpoints:
Creating a new job
curl --location 'https://ex-offenders.co.uk/api/jobs/' \
--header 'Content-Type: application/json' \
--data '{
  "title": "Software Engineer II",
  "description": "Software Engineer with 2 years of experience",
  "owner_id": "5690cc29-5008-4a81-8f08-db92e01d6d44",
  "category_id": 17
}'
RBAC: access denied
Get job by ID
curl --location 'https://ex-offenders.co.uk/api/jobs/bff285f6-34f6-4c5f-9619-2e860bec2d87'
{"title":"Software Engineer","description":"Software Engineer with 2 years of experience","owner_id":"5690cc29-5008-4a81-8f08-db92e01d6d44","category_id":17,"id":"bff285f6-34f6-4c5f-9619-2e860bec2d87"}
Creating a new job category
 curl --location 'https://ex-offenders.co.uk/api/jobcategories/' \
--header 'Content-Type: application/json' \
--data '{
    "name": "Computer Science"
}'
RBAC: access denied
Get job category by ID
curl --location 'https://ex-offenders.co.uk/api/jobcategories/17'
{"name":"Information Technology","id":17}
As observed, we can retrieve information without authentication. However, authentication is necessary for adding, modifying, or deleting entries.
Next, let’s generate a token by calling the Keycloak token URL and use it to perform add, modify, or delete operations:
Generating a token
curl --location 'https://auth.ex-offenders.co.uk/realms/ex-offenders/protocol/openid-connect/token' \
--header 'Content-Type: application/x-www-form-urlencoded' \
--data-urlencode 'grant_type=password' \
--data-urlencode 'client_id=ex-offenders-platform' \
--data-urlencode 'username=<username>' \
--data-urlencode 'password=<password>'
This returns an access token, which we can use for subsequent requests.
Creating a new job
curl --location 'https://ex-offenders.co.uk/api/jobs/' \
--header 'Content-Type: application/json' \
--header 'Authorization: Bearer <token>' \
--data '{
  "title": "Software Engineer II",
  "description": "Software Engineer with 2 years of experience",
  "owner_id": "5690cc29-5008-4a81-8f08-db92e01d6d44",
  "category_id": 17
}'

{
    "title": "Software Engineer II",
    "description": "Software Engineer with 2 years of experience",
    "owner_id": "5690cc29-5008-4a81-8f08-db92e01d6d44",
    "category_id": 17,
    "id": "571c9ce6-566f-4e57-a780-9af5275ce5ef"
}
As demonstrated, authenticated users are able to successfully add, modify, or delete jobs and job categories.
Improving the Code with Additional Constraints
At this point, if you examine the source code of (job-service-v1, you’ll notice it focuses solely on core functionality without incorporating authentication and authorization concerns, which are managed entirely by Istio. However, this approach has some drawbacks.
We currently need to manually provide the owner_id when creating a job, whereas ideally, this should be automatically set to the ID of the logged-in user. Moreover, a user should not have the ability to modify a job created by someone else. This necessitates that the backend service is aware of the logged-in user’s ID and can enforce this constraint. We have addressed these issues in the v2 service. Please see the implementation here.
Populate owner_id during job creation
@router.post("/", response_model=JobPublic)
def create_job(*, session: Session = Depends(get_session), job: JobCreate, request: Request, user_id: str = Depends(get_user_id_from_token)):
    db_job = Job.model_validate(job)
    db_job.id = str(uuid.uuid4())
    db_job.owner_id = user_id
    session.add(db_job)
    session.commit()
    session.refresh(db_job)

    return db_job
In this post method, we have included get_user_id_from_token as a dependency to inject the user_id into owner_id during job creation.
def get_user_id_from_token(request: Request) -> str:
    try:
        token = request.headers.get("Authorization").split("Bearer ")[1]
        payload = jwt.decode(token, options={"verify_signature": False})
        user_id: str = payload.get("sub")
        if user_id is None:
            raise HTTPException(status_code=401, detail="User ID not found in token")
        return user_id
    except:
        raise HTTPException(status_code=401, detail="Could not validate credentials")
Validate the ownership
In the following PATCH method, we validate whether the job is owned by the logged-in user. If not, the user is not allowed to modify the job.
@router.patch("/{job_id}", response_model=JobPublic)
def update_job(*, session: Session = Depends(get_session), job_id: str, job: JobUpdate, request: Request, user_id: str = Depends(get_user_id_from_token)):
    db_job = session.get(Job, job_id)
    if not db_job:
        raise HTTPException(status_code=404, detail="Job not found")
    if db_job.owner_id != user_id:
        raise HTTPException(status_code=403, detail="You do not have permission to update this job")
    job_data = job.model_dump(exclude_unset=True)
    db_job.sqlmodel_update(job_data)
    session.add(db_job)
    session.commit()
    session.refresh(db_job)
    return db_job
Let’s route all traffic to job-service v2. We can achieve this by modifying the virtual service.
apiVersion: networking.istio.io/v1alpha3
kind: VirtualService
metadata:
  name: job-service
  namespace: job-service
spec:
  hosts:
    - "www.ex-offenders.co.uk"
    - "ex-offenders.co.uk"
    - job-service.job-service.svc.cluster.local
  gateways:
    - istio-system/gateway
    - mesh
  http:
    - match:
        - uri:
            prefix: "/api/jobs"
        - uri:
            prefix: "/api/jobcategories"
      route:
        - destination:
            host: job-service.job-service.svc.cluster.local
            subset: v1
          weight: 0
        - destination:
            host: job-service.job-service.svc.cluster.local
            subset: v2
          weight: 100
Now, Let’s try to create a job without owner_id. Please note that, now JobCreate data model no longer has owner_id attribute.
 curl --location 'https://ex-offenders.co.uk/api/jobs/' \
--header 'Content-Type: application/json' \
--header 'Authorization: Bearer <token>' \
--data '{
  "title": "Software Engineer III",
  "description": "Software Engineer with 2 years of experience",
  "category_id": 17
}'
{"title":"Software Engineer III","description":"Software Engineer with 2 years of experience","category_id":17,"id":"b3b1baa8-91bc-42bd-9736-94f13b39b610","owner_id":"78de9a7a-7bcb-4b61-9c27-478704a1986a"}
As you can see, we do not require to specify the owner_id. FastAPI automatically inject the ID of the logged-in user.
Let’s try to modify a job
Let’s attempt to modify a job owned by someone else.
curl --location --request PATCH 'https://ex-offenders.co.uk/api/jobs/2f736c4d-11ba-421f-953a-d1d6f0e5b653' \
--header 'Content-Type: application/json' \
--header 'Authorization: Bearer <token>' \
--data '{
  "title": "Software Engineer IV"
}'
{"detail":"You do not have permission to update this job"}
As you can see, we are unable to modify jobs owned by someone else.
Implementing Authorization with Istio
At this point, we have configured authentication. When it comes to job categories, we do not expect a large number to be present in the database. It makes sense to maintain a limited number of job categories and restrict creation, modification, and deletion to admin users only.
Currently, anyone with valid authentication can modify job categories. Let’s see how we can implement authorization.
We modify our authorization policy to ensure that only users with the admin role can modify job categories. Alternatively, you can use “groups” if you have a more complex user hierarchy.
apiVersion: security.istio.io/v1beta1
kind: AuthorizationPolicy
metadata:
  name: job-service
  namespace: job-service
spec:
  selector:
    matchLabels:
      app: job-service
  rules:
  - to:
    - operation:
        methods: ["GET"]
  - from:
    - source:
        requestPrincipals: ["*"]
    to:
    - operation:
        methods: ["POST", "DELETE", "PATCH"]
        paths: ["/api/jobs*"]
  - from:
    - source:
        requestPrincipals: ["*"]
    when:
    - key: request.auth.claims[realm_access][roles]
      values: ["admin"]
    to:
    - operation:
        methods: ["POST", "DELETE", "PATCH"]
        paths: ["/api/jobcategories*"]
We can create the admin role by navigating to “Realm Roles” under the Keycloak realm we use. After that, we go to the respective user we want to assign the admin role to, click on the “Role Mapping” tab, and add the user to the newly created “admin” role.


Creating a Job Category - Regular User
curl --location 'https://ex-offenders.co.uk/api/jobcategories/' \location 'https://ex-offenders.co.uk/api/jobcategories/' \
--header 'Content-Type: application/json' \
--header 'Authorization: Bearer <token>' \
--data '{
    "name": "Research"
}'
RBAC: access denied
Creating a Job Category - Admin User
curl --location 'https://ex-offenders.co.uk/api/jobcategories/' \i/jobcategories/' \
--header 'Content-Type: application/json' \
--header 'Authorization: Bearer <token>' \
--data '{
    "name": "Research"
}'
{"name":"Research","id":20}
As we can see, only admin users can create/update/delete job categories now.
Implementing Authorization between MicroServices
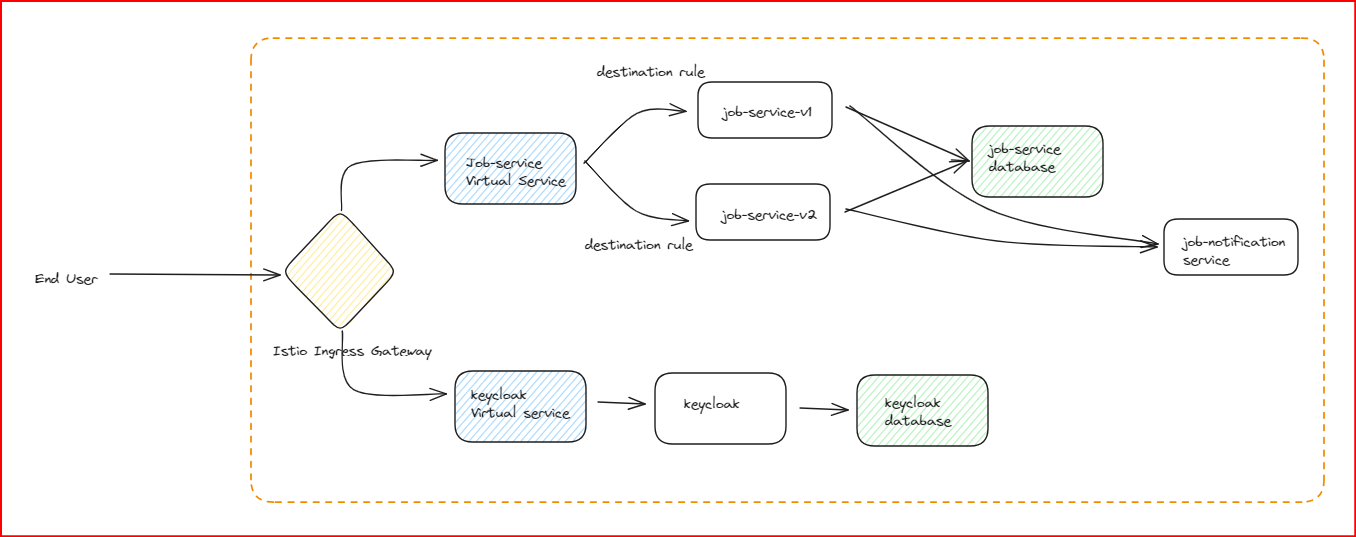
Now we add another microservice called “job-notification-service”.

This service is not exposed via the gateway and should be accessible only by “job-service”. To achieve this, we can add the following authorization policy.
apiVersion: security.istio.io/v1beta1
kind: AuthorizationPolicy
metadata:
  name: job-notification-service
  namespace: job-notification-service
spec:
  selector:
    matchLabels:
      app: job-notification-service
  rules:
  - from:
    - source:
        namespaces: ["job-service"]
        principals: ["cluster.local/ns/job-service/sa/job-service"]
Conclusion
In conclusion, we have implemented authentication and authorization for our microservices using Istio and Keycloak, ensuring secure access to resources. We’ve configured policies to control access based on roles and user identities, enhancing the overall security posture of our applications.
I welcome any feedback you may have regarding areas for improvement, any aspects that may have been overlooked, or suggestions to enhance this document.
Note: This page is part of Cloud Agnostic Platform guide. Click here to access the main page.
